My Latest "Project Lathe"
by
James P. Riser
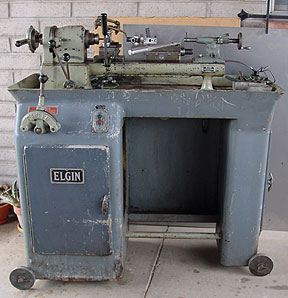
An old Elgin Lathe by Elgin Tool Works in Chicago
My plan is to get this old Elgin into service
as a production machine within the next month or so and to get
it production ready not to restore it to new condition
as I plan on putting it to work in my magic apparatus manufacturing
business. It does need lots of cleaning; but seems mechanically
sound. I do want it to look presentable, though.
I knew this was a quality lathe when I bought it; but
did not realize the pedigree. It turns out that Hardinge
made an early version of this lathe named the "Cataract".
The "Cataract" name came from the river cataracts
outside the original factory in Chicago. In the late 1930's Hardinge
changed the name to Elgin. and they continued to be made
in Chicago - where the Hardinge brothers began.
(See tailstock illustration below)
I just received a tip from Jim Rozen that the tailstock
barrel had been reversed at some time (see all of the other pictures).
I have just fixed that problem. Thanks for the tip, Jim. The allen
wrench locking mechanism on the tailstock is not original.
The tailstock as it should be - except it still needs
a locking lever made and installed.  Compare this tailstock to the old illustration shown
below. Notice the details of the tailstock and lathe bed. Identical!
This is an illustration of a Hardinge Cataract tailstock.
Compare this tailstock to the old illustration shown
below. Notice the details of the tailstock and lathe bed. Identical!
This is an illustration of a Hardinge Cataract tailstock.
 The first thing I did was to weld the ball bearing
steel wheels onto the base of the heavy steel cabinet. This machine
is extremely heavy and the wheels make moving it on a smooth,
hard surface rather simple. They do not affect operation of the
machine in any way.
The first thing I did was to weld the ball bearing
steel wheels onto the base of the heavy steel cabinet. This machine
is extremely heavy and the wheels make moving it on a smooth,
hard surface rather simple. They do not affect operation of the
machine in any way.
 The lathe has a
high and low range of forward and reverse variable speeds
Here is a better view of the operating levers.
The lathe has a
high and low range of forward and reverse variable speeds
Here is a better view of the operating levers.  I checked out the electrics and drive train today today.
It runs beautifully; but the wire into the lathe needed to be
replaced! The speed range is incredible on this lathe - it goes
from just tickling over to above 3000 rpm. Things are looking
good!
I checked out the electrics and drive train today today.
It runs beautifully; but the wire into the lathe needed to be
replaced! The speed range is incredible on this lathe - it goes
from just tickling over to above 3000 rpm. Things are looking
good!
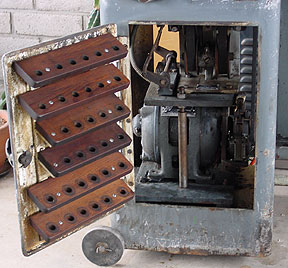
 The collets are a rather odd "00" size and
are stored in the wooden racks inside the main door. A nice assortment
of collets came with the lathe. I still want a few more square
and hex collets.
The motor is a 2 speed 3 phase motor and variable speed
is by a nice belt drive system.
There is additional storage at the end of the lathe.
The collets are a rather odd "00" size and
are stored in the wooden racks inside the main door. A nice assortment
of collets came with the lathe. I still want a few more square
and hex collets.
The motor is a 2 speed 3 phase motor and variable speed
is by a nice belt drive system.
There is additional storage at the end of the lathe.

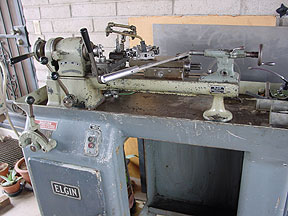
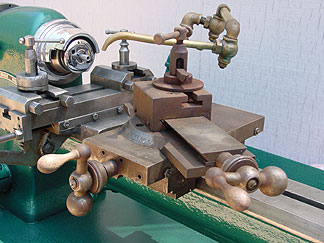
 The lathe is equipped with a double action cross slide,
six position turret, and a standard type of tailstock.
The access panels around the motor have been removed
for cleaning. I do have them.
The turret - that is a knurling tool in the turret.
The lathe is equipped with a double action cross slide,
six position turret, and a standard type of tailstock.
The access panels around the motor have been removed
for cleaning. I do have them.
The turret - that is a knurling tool in the turret.
 The lathe also has a flood type of coolant pump and
system installed.
The lathe also has a flood type of coolant pump and
system installed.  I have just purchased a compound cross slide for the
machine and a geometric die head to get things a little more complete.
The cross slide is shown at the bottom of this page.
Here are several images of the Geometric Die Head
(I received a good assortment of die cutters with it - not shown):
I have just purchased a compound cross slide for the
machine and a geometric die head to get things a little more complete.
The cross slide is shown at the bottom of this page.
Here are several images of the Geometric Die Head
(I received a good assortment of die cutters with it - not shown):


 I'm sure I'll be needing several specialized 5/8"
shank tools and holders for the turret.
And there are also a couple small boxes of assorted
spare parts, extra collets, gauges, and "stuff".
I'm sure I'll be needing several specialized 5/8"
shank tools and holders for the turret.
And there are also a couple small boxes of assorted
spare parts, extra collets, gauges, and "stuff".

 All of these pictures are the "before" pictures.
When the lathe is operational, I'll post the "after"
pictures. I thought "machinery types" might like to
see the progress.
All of these pictures are the "before" pictures.
When the lathe is operational, I'll post the "after"
pictures. I thought "machinery types" might like to
see the progress.
The clean up has started.......
I got the heavy lathe moved into my back yard where
I can hook it up to 3 phase and do the actual cleaning. (Anyone
have a cheap forklift?) I could not stay away from the machine
- so I started the clean up on the old Elgin.
The tailstock has been disassembled, paint removed,
and cleaned.
 Here is what the
bare metal looks like. It still needs a lever release made.
The double action cross slide has been disassembled
and cleaned. "Dings" on this cross slide do not affect
operation and will remain rather than being ground off.
Here is what the
bare metal looks like. It still needs a lever release made.
The double action cross slide has been disassembled
and cleaned. "Dings" on this cross slide do not affect
operation and will remain rather than being ground off.

 The turret has been disassembled, any internal
burs removed, mechanism cleaned, adjusted, and reassembled. This
turret works fine but has many "dings" on the rotating
head. Since these surface "dings" do not affect the
operation of the turret, I have decided to leave them as is. If
I remove them, I will get into the individual tool holder gripping
mechanisms and possibly damage them. After all, I am trying to
end up with a working machine not a museum piece.
Here is a "before" image of the turret showing
the various superficial dings - all cosmetic problems. The rust
is gone now!
Before cleaning etc.
The turret has been disassembled, any internal
burs removed, mechanism cleaned, adjusted, and reassembled. This
turret works fine but has many "dings" on the rotating
head. Since these surface "dings" do not affect the
operation of the turret, I have decided to leave them as is. If
I remove them, I will get into the individual tool holder gripping
mechanisms and possibly damage them. After all, I am trying to
end up with a working machine not a museum piece.
Here is a "before" image of the turret showing
the various superficial dings - all cosmetic problems. The rust
is gone now!
Before cleaning etc.  After disassembling, cleaning, adjusting, etc.
  The spindle nose is shown here - both before
and after. Since I have all of that buffing equipment for my metal
spinning, I thought I would clean up and buff the spindle nose
cap. It is not plated. That is just highly polished bare steel.
Preliminary testing of the lathe indicates that it is going to
be a very nice machine. It is much higher quality than my 9"
Southbend lathe; but not as versatile (no threading, power feed,
etc.). But, what a production machine!
The spindle nose is shown here - both before
and after. Since I have all of that buffing equipment for my metal
spinning, I thought I would clean up and buff the spindle nose
cap. It is not plated. That is just highly polished bare steel.
Preliminary testing of the lathe indicates that it is going to
be a very nice machine. It is much higher quality than my 9"
Southbend lathe; but not as versatile (no threading, power feed,
etc.). But, what a production machine!

 The headstock and pan with loose paint
removed.
The headstock and pan with loose paint
removed.  The next area to receive attention was the other end
of the headstock. After checking, cleaning, and adjusting the
collet release mechanism, the collet release yoke was disassembled
and cleaned.
"Before" is on the left and "after"
is on the right.
The next area to receive attention was the other end
of the headstock. After checking, cleaning, and adjusting the
collet release mechanism, the collet release yoke was disassembled
and cleaned.
"Before" is on the left and "after"
is on the right.
 The yoke of the collet
release has been cleaned/polished.
The yoke of the collet
release has been cleaned/polished.  Another view.
 The drive system
after quite a bit of cleaning.
After additional cleaning, the painting was started.
The drive system
after quite a bit of cleaning.
After additional cleaning, the painting was started.
 The headstock as
it now looks.
The headstock as
it now looks.  The tailstock after painting.
 The controls as
they now look.
The completed drive system (the louvered side panels
will be gloss black).
The controls as
they now look.
The completed drive system (the louvered side panels
will be gloss black). 
 The storage section
of the base cabinet.
The "before"
and "after".
The storage section
of the base cabinet.
The "before"
and "after". And with the cross slide, turret, and tailstock..........
 Oops..............I just found this spindle nose shield
in the box of "extras".
Oops..............I just found this spindle nose shield
in the box of "extras".  Cleaned and buffed up it looks like this:
 And a close-up...
 Trouble in paradise!
The old Ames Lathe Compound Cross Slide I want
to adapt to this Elgin Lathe arrived today. The qualiity
is excellent; but lots of surface rust to be removed.
Trouble in paradise!
The old Ames Lathe Compound Cross Slide I want
to adapt to this Elgin Lathe arrived today. The qualiity
is excellent; but lots of surface rust to be removed.
 The problem is the height. If you examine the image
below, you will see that the cutter height is higher than the
lathe center.
The problem is the height. If you examine the image
below, you will see that the cutter height is higher than the
lathe center.
 My plan to solve this problem is to disassemble the
compound and remove approximately 1/8" of metal from the
bottom of the compound base. I will also remove another 1/8"
from the top of the tool rest base. By removing the thick washer
under the lathe tool, I will pick up another 1/4" in height.
This should do the job.
I'll use my 12" Sheldon Shaper to cut the metal
down to size. This will also leave a nice finish on the freshly
machined surfaces.
Problem #2 with the Ames Compound is the front guide.
I will need to taper this to match the taper on the
lathe bed - another shaper job.
My plan to solve this problem is to disassemble the
compound and remove approximately 1/8" of metal from the
bottom of the compound base. I will also remove another 1/8"
from the top of the tool rest base. By removing the thick washer
under the lathe tool, I will pick up another 1/4" in height.
This should do the job.
I'll use my 12" Sheldon Shaper to cut the metal
down to size. This will also leave a nice finish on the freshly
machined surfaces.
Problem #2 with the Ames Compound is the front guide.
I will need to taper this to match the taper on the
lathe bed - another shaper job.  I ended up using a spare compound cross slide from
a watchmaker's lathe rather than cutting down the Ames shown above.
I needed to get the machine into production so the Ames modification
will have to wait. The lathe is shown here making chips.
I ended up using a spare compound cross slide from
a watchmaker's lathe rather than cutting down the Ames shown above.
I needed to get the machine into production so the Ames modification
will have to wait. The lathe is shown here making chips.
 The 5C collet chuck is a Bison brand. I machined a
deeper (thicker) than normal back plate to give me additional
space for 1" diameter stock within and behind the collet
chuck. The lathe spindle hole will not handle 1" stock.
The 5C collet chuck is a Bison brand. I machined a
deeper (thicker) than normal back plate to give me additional
space for 1" diameter stock within and behind the collet
chuck. The lathe spindle hole will not handle 1" stock.
 I have also added a four jaw chuck and two three jaw
chucks. I use two three jaw chucks since it is much faster changing
chucks than jaws - and time is money!
I have also added a four jaw chuck and two three jaw
chucks. I use two three jaw chucks since it is much faster changing
chucks than jaws - and time is money!


 I really like this old Elgin lathe and have found it
to be a pleasure to use.
Four years after the restoration, things look like
this...
I really like this old Elgin lathe and have found it
to be a pleasure to use.
Four years after the restoration, things look like
this...
 I picked up one
of the correct tailstocks for this model of Elgin (the other works
fine).
I also acquired a cross slide and an extra lathe bed
with the tailstock. I use it to store lathe parts not being used
at the time.
I picked up one
of the correct tailstocks for this model of Elgin (the other works
fine).
I also acquired a cross slide and an extra lathe bed
with the tailstock. I use it to store lathe parts not being used
at the time.
 Another view of the overall lathe setup...
 This lathe has worked out well for me. It is a quality
machine.
Click here to
go to my web site.
This lathe has worked out well for me. It is a quality
machine.
Click here to
go to my web site.