Testing of the Sears Powder Coating Gun
Variable Speed Self Contained Blower Model
Copyright 2005 by James
P. Riser
This page will describe some testing I did with the
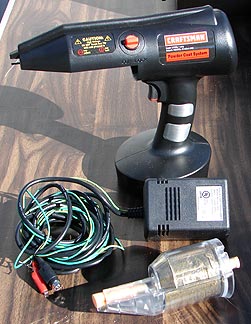
new Sears Craftsman Powder Coating System.
The system includes the gun, one color cup, transformer,
high temperature masking tape, high temperature plugs, hooks,
and a plastic case.
The Sears powder coating material is supplied in small
bags.  The powder in each bag should cover up to 7 square
feet of surface.
The powder in each bag should cover up to 7 square
feet of surface.
 I
have purchased a variety of powders for testing from Columbia
Coatings
I
have purchased a variety of powders for testing from Columbia
Coatings
I wanted a powder coating system that I could run without
turning on my noisy air compressor. So I thought I would try the
new Sears Powder Coating System. It was on sale - so I decided
to act now!
Since I only manufacture rather small items, I require
only a smaller size of oven for curing the powder on many items.
Fortunately I discovered a toaster oven at Walmart for less than
$13! This was about what I wanted to spend on such an oven. In
addition to small size, I wanted a window in the door so that
I could monitor the curing process. This little oven even has
a timer on it to shut down the elements after up to 15 minutes.
If I like everything, I'll pick up a larger oven for quantity
production.
 This is the $13
toaster oven I selected for my use.
Here is the oven "on" during the curing process.
This is the $13
toaster oven I selected for my use.
Here is the oven "on" during the curing process.

 The sample to be powder coated is a small spun copper
dish (similar to the products I will want to powder coat).
Here is a close up view of curing in operation - the
powder has begun to flow.
The copper was sanded down to bare metal and cleaned
off with lacquer thinner. The coating I selected is a textured
coating with black and gold flecks.
I did not clean the scrap steel plate used to support
the dish; but it also ended up with a nice coating.
The sample to be powder coated is a small spun copper
dish (similar to the products I will want to powder coat).
Here is a close up view of curing in operation - the
powder has begun to flow.
The copper was sanded down to bare metal and cleaned
off with lacquer thinner. The coating I selected is a textured
coating with black and gold flecks.
I did not clean the scrap steel plate used to support
the dish; but it also ended up with a nice coating. 
 Here is another
view. There are three layers of coating on this test sample.
I applied the three layers in this manner: 1st layer
as usual; 2nd layer as soon as the powder began to flow; 3rd layer
when the second layer began to flow.
This will give you an idea of the size involved.
Here is another
view. There are three layers of coating on this test sample.
I applied the three layers in this manner: 1st layer
as usual; 2nd layer as soon as the powder began to flow; 3rd layer
when the second layer began to flow.
This will give you an idea of the size involved.  I am very pleased with the new Sears equipment. The
finished coating is very professional looking. This system will
definitely meet my needs.
I am very pleased with the new Sears equipment. The
finished coating is very professional looking. This system will
definitely meet my needs.
Here is additional testing on a 3" diameter aluminum
disc about 1/4" thick.
 I machined the
surface and smoothed with a 150 grit abrasive pad using oil.
The rim of the disc was lightly filed then sanded.
I wanted a surface for the powder to adhere to and I wanted to
determine if the machining would still be visible.
This disc was supported by a smaller disc to raise
it up off of the support steel plate.
I machined the
surface and smoothed with a 150 grit abrasive pad using oil.
The rim of the disc was lightly filed then sanded.
I wanted a surface for the powder to adhere to and I wanted to
determine if the machining would still be visible.
This disc was supported by a smaller disc to raise
it up off of the support steel plate. 
 The ground wire
was clamped to the supporting steel plate.
The ground wire
was clamped to the supporting steel plate.
 The gun power was
attached - to charge the powder as it passes the tip electrode.
The gun power was
attached - to charge the powder as it passes the tip electrode.

 The powder after
being applied by the gun.
The powder after
being applied by the gun.  The powder is only held on to the metal by static electricity.

 Things look like this as the disc is placed into the
preheated oven.
Notice that the powder looks like fine grit.
Things look like this as the disc is placed into the
preheated oven.
Notice that the powder looks like fine grit.
 Once the disc comes
up to temperature, the powder begins to flow.
The flow continues with the surface becoming smoother.
Once the disc comes
up to temperature, the powder begins to flow.
The flow continues with the surface becoming smoother.

 When the metal
was at temperature and the flow smoothed out, I set the timer
for 15 minutes.
This is how things looked when the powder was fully
cured.
When the metal
was at temperature and the flow smoothed out, I set the timer
for 15 minutes.
This is how things looked when the powder was fully
cured. 

 Here is a comparison between the two tested objects.
The three step layer on the thin copper dish is much finer grained.
The coating on the thicker aluminum disc is much more
textured and the gold veining more pronounced.
Both are professional looking and feeling coatings.
Here is a comparison between the two tested objects.
The three step layer on the thin copper dish is much finer grained.
The coating on the thicker aluminum disc is much more
textured and the gold veining more pronounced.
Both are professional looking and feeling coatings.
A Test of Transparent blue Powder
One of the colors that I want to use is a transparent
blue.
This is how it comes from Columbia Coatings 
 I have added an
oven thermometer to my setup.
This aluminum cylinder is to be powder coated for this
test.
I have added an
oven thermometer to my setup.
This aluminum cylinder is to be powder coated for this
test. Notice the blemishes on the top. I wanted to
determine how "sloppy" I could be and still get a good
coating.
Notice the blemishes on the top. I wanted to
determine how "sloppy" I could be and still get a good
coating.
 After cleaning
the cylinder with lacquer thinner, I set it in the oven to preheat.
Columbia Coatings indicates that this powder should
be used over their chrome base coat; but I wanted to see how it
would look over semi polished aluminum without the chrome base
coat.
The transparent blue powder was poured into the color
cup.
After cleaning
the cylinder with lacquer thinner, I set it in the oven to preheat.
Columbia Coatings indicates that this powder should
be used over their chrome base coat; but I wanted to see how it
would look over semi polished aluminum without the chrome base
coat.
The transparent blue powder was poured into the color
cup.  The applied powder looked like this...


 There is always
a little blowby of powder onto the gun.
This stray powder can be quickly removed with a good
blow or with a damp towel.
The still warm cylinder was returned to the oven.
There is always
a little blowby of powder onto the gun.
This stray powder can be quickly removed with a good
blow or with a damp towel.
The still warm cylinder was returned to the oven. 
 After a few minutes
at between 375 and 400 degrees, the powder begins to flow.
When fully cured (around 20-25 minutes), the cylinder
looks like this.
After a few minutes
at between 375 and 400 degrees, the powder begins to flow.
When fully cured (around 20-25 minutes), the cylinder
looks like this.  The coating is beautiful - except for where I made
a few mistakes. I coated outdoors and just when I began to spray
the powder, the wind kicked up. A few specs of dust found their
way onto the cylinder top as the powder was sprayed. You can also
see traces in the coating from lint (from the paper towel I used
to clean the cylinder - lint free cloth towel from now on). Also
the original blemishes left on the semi polished cylinder for
testing do show through. A higher degree of buffing would have
taken care of this problem. Defects can be seen in the image below.
This is the surface with the problems.
The coating is beautiful - except for where I made
a few mistakes. I coated outdoors and just when I began to spray
the powder, the wind kicked up. A few specs of dust found their
way onto the cylinder top as the powder was sprayed. You can also
see traces in the coating from lint (from the paper towel I used
to clean the cylinder - lint free cloth towel from now on). Also
the original blemishes left on the semi polished cylinder for
testing do show through. A higher degree of buffing would have
taken care of this problem. Defects can be seen in the image below.
This is the surface with the problems.
 I also was interested in seeing if I could buff up
the aluminum right next to the powder coating without ruining
the coating. This can not be done with a painted item.
I also was interested in seeing if I could buff up
the aluminum right next to the powder coating without ruining
the coating. This can not be done with a painted item.
 Here is the same
cylinder after I polished the rim on my buffer.
And a close-up of the line between the newly polished
top and the coating. Smooth!
Here is the same
cylinder after I polished the rim on my buffer.
And a close-up of the line between the newly polished
top and the coating. Smooth!  I also wanted to test the coating for flexibility -
so I bent the plate that was supporting the cylinder.
I also wanted to test the coating for flexibility -
so I bent the plate that was supporting the cylinder. Conclusions:
1. The Sears syatem works.
2. This system works with powders from other suppliers.
3. Surface prep is critical - especially for transparent
coatings.
4. Do not try to powder coat in the dusty wind.
5. The coatings are tough yet flexible.
6. With a well buffed finish the Columbia Coatings
transparent powders should work well - even without the chrome
base coat.
In conclusion, I feel that the new Sears syatem can
provide the home shop worker with a viable powder coating method.
New addition!!!
Since I am running a small business, I wanted to do
powder coating on several of the items that I manufacture. The
small toaster oven was fine for testing and a few one-of-a-kind
items; but too small for production purposes. So when I received
a 20% off coupon from Harbor freight, I decided to finally get
one of their powder coating ovens (made in India). I considered
converting an old kitchen oven into a powder coating oven; but
wanted to stick with 110 voltage as I would be moving things around
in the shop and 220 might not be where it was needed for an oven.
In addition, this looks better.
Conclusions:
1. The Sears syatem works.
2. This system works with powders from other suppliers.
3. Surface prep is critical - especially for transparent
coatings.
4. Do not try to powder coat in the dusty wind.
5. The coatings are tough yet flexible.
6. With a well buffed finish the Columbia Coatings
transparent powders should work well - even without the chrome
base coat.
In conclusion, I feel that the new Sears syatem can
provide the home shop worker with a viable powder coating method.
New addition!!!
Since I am running a small business, I wanted to do
powder coating on several of the items that I manufacture. The
small toaster oven was fine for testing and a few one-of-a-kind
items; but too small for production purposes. So when I received
a 20% off coupon from Harbor freight, I decided to finally get
one of their powder coating ovens (made in India). I considered
converting an old kitchen oven into a powder coating oven; but
wanted to stick with 110 voltage as I would be moving things around
in the shop and 220 might not be where it was needed for an oven.
In addition, this looks better.
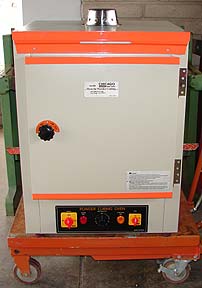 This is what the
oven looks like.
Here are the controls.
This is what the
oven looks like.
Here are the controls. 
 The
interior circulating fan was a feature that I felt I wanted.
The interior is all stainless steel and comes with
one rack and two hanging bars - fine for my needs.
The
interior circulating fan was a feature that I felt I wanted.
The interior is all stainless steel and comes with
one rack and two hanging bars - fine for my needs. 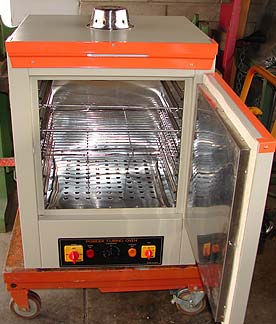
 The three heating
elements are in the bottom of the oven.
Another feaure I wanted was the built in mercury thermometer.
The three heating
elements are in the bottom of the oven.
Another feaure I wanted was the built in mercury thermometer.
 This larger oven will make my work much easier. If
interested, you may find the oven specs on the Harbor freight
site.
This larger oven will make my work much easier. If
interested, you may find the oven specs on the Harbor freight
site.