Engraving a Copper Cup
Copyright 2010 by James P. Riser
Note: This is a sample from an ebook that I
am currently creating.
In this publication I shall explain in detail the techniques
I use to engrave metal cups. The process will feature hand engraving.
CNC work is avoided due to the "mechanical look" of
the cuts done by that technique. Only hand work can create the
desired bright cuts identified with quality engravings.
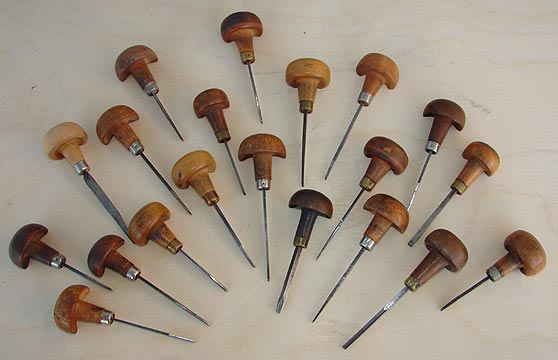
In order to engrave the metal an assortment of gravers
is required. The number and types of gravers required depends
upon the type of work to be done. Here are an assortment of hand
gravers that I like for such work.
 In addition to the mounted gravers shown above, I have
a large selection of unmounted gravers for special effects or
detail work. These are stored in a maple block. I either mount
these in mushroom handles as shown above or in my pneumatic hand
pieces - to be shown later.
In addition to the mounted gravers shown above, I have
a large selection of unmounted gravers for special effects or
detail work. These are stored in a maple block. I either mount
these in mushroom handles as shown above or in my pneumatic hand
pieces - to be shown later.
 And a close up of these gravers ...


 The next problem to be considered is how to hold the
cup to be engraved. I prefer to use an engravers block or vise.
Shown below are several from my shop. The first is from about
1850 and still works perfectly.
The next problem to be considered is how to hold the
cup to be engraved. I prefer to use an engravers block or vise.
Shown below are several from my shop. The first is from about
1850 and still works perfectly.

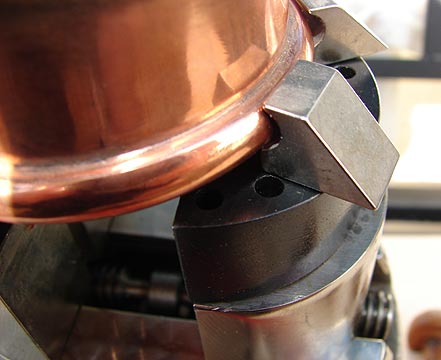
 The second block is from the same era or slightly earlier.
It also works as well as when new. Below it can be seen gripping
a copper cup for engraving the bottom.
The second block is from the same era or slightly earlier.
It also works as well as when new. Below it can be seen gripping
a copper cup for engraving the bottom.

 All of the engravers blocks feature top jaws with an
arrangement of small holes. These holes are to hold various attachments
to aid in gripping oddly shaped items.
All of the engravers blocks feature top jaws with an
arrangement of small holes. These holes are to hold various attachments
to aid in gripping oddly shaped items.
 Here is a typical attachment set for an engravers block.


 A block and its
attachment set ...
Here are cup holder jaws securing a cup for engraving
the bottom. Other attachment jaws are used when engraving the
sides of the cup.
A block and its
attachment set ...
Here are cup holder jaws securing a cup for engraving
the bottom. Other attachment jaws are used when engraving the
sides of the cup.

 This a new style very heavy duty engravers block for
use with pneumatic tools. The top jaws have been removed for holding
a small metal plate to be engraved.
This a new style very heavy duty engravers block for
use with pneumatic tools. The top jaws have been removed for holding
a small metal plate to be engraved.

 In order to do quality engravings the engraver must
be able to accurately sharpen the gravers. Shown here is a traditional
style graver sharpener. It is used with varying grits of stones
- ending with an Arkansas stone for the final polishing grind.
You can see that the angles may be easily adjusted.
In order to do quality engravings the engraver must
be able to accurately sharpen the gravers. Shown here is a traditional
style graver sharpener. It is used with varying grits of stones
- ending with an Arkansas stone for the final polishing grind.
You can see that the angles may be easily adjusted.

 A newer style of graver holder for sharpening on a
diamond hone is shown below. This is adequate for many needs.
A newer style of graver holder for sharpening on a
diamond hone is shown below. This is adequate for many needs.

 The ultimate graver holder is shown below. All angles
may be adjusted with ease. This is to be used with a powered diamond
home.
The ultimate graver holder is shown below. All angles
may be adjusted with ease. This is to be used with a powered diamond
home.

 More to come - some day (possibly only in the finished
publication).
More to come - some day (possibly only in the finished
publication).